Hello Readers,
Here we will continue our R regression series and after working with ordinary, and robust regression, we will address partial least squares regression. Using the same chemical descriptors data set, we will predict solubility of compounds with a different approach of looking at the predictors themselves and how they relate to each other.
In many data sets, the predictors we use could be correlated to the response (what we are looking for) and to each other (not good for variability). If too many predictor variables are correlated to each other, then the variability would render the regression unstable.
One way to correct for predictor correlation is to use PCA or principle component analysis which seeks to find a linear combination of predictors to capture the most variance. The jth principal component (PC) can be written as:
PCj = (aj1 * predictor 1) + (aj2 * predictor 2) + ... + (ajp * predictor p)
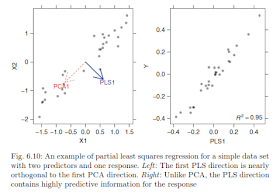
However this method does not always produce a PC that correlates with the response variable as shown below:
 |
| From Max Kuhn's Applied Predictive Modeling |
Whereas using partial least squares regression, we see that it is correlated with the response variable.
 |
| From Max Kuhn's Applied Predictive Modeling |
So start R and let us look at partial least squares regression!
Partial Least Squares
PLS regression, like PCA, seeks to find components which maximize the variability of predictors but differs from PCA as PLS requires the components to have maximum correlation with the response. PLS is a supervised procedure whereas PCA is unsupervised.
First we require the following R packages, specifically the pls library:
 |
| R Packages |
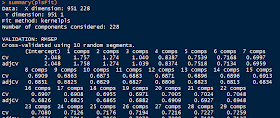
In the pls library, we will use the plsr() function for partial least squares regression. We specify the response variable as solubility, use all the predictor variables with a ".", and include cross-validation parameter as "CV".
| plsr() and Prediction |
 |
| Solubility Values for 1 and 2 Components |
The first section displays the root mean squared error of prediction (RMSEP), cross-validation estimate, as well as the adj-CV, which is adjusted for bias. Take note of the dimensions of X and Y of the data towards the top of the output.
 |
| pls Summary Part 1 |
 |
| pls Summary Part 2 |
PLS Prediction Error
There are two methods able to produce the visualization of RMSEP. The first uses the function validationplot() from the pls package which will give us the RMSEP plot for each component iteration in the model. Specify the validation type to be "val.type=RMSEP".
 |
| validationplot() |
However we want to find the component number corresponding to lowest point in the RMSEP. Using the RMSEP() function with estimate parameter set to "CV" we can derive the desired value. The plot() will give us the initial graph- see how similar it is to the plot obtained from validationplot(). (They should be the same.)
| RMSEP() and plot() |
To calculate the lowest RMSEP, we use the which.min() function, which returns the index of the lowest value. The minimum value is found at 10 components and we add a point to the plot using the points() function such that the x and y values are: (component number, minimum RMSEP value).
 |
| Finding Lowest RMSEP |
 |
| RMSEP() with points() |
plot(plsFit, ncomp=10, asp=1, line=True)
 |
| Checking Training Predictions |
Predicted Solubilities
Now that we have an optimal component number (10), we can go ahead and use the plsr model to predict new solubility values for test predictor data. Again we use the predict() function and specify the test data (solTestXtrans) and the number of components (ncomp=10).
 |
| Predicting Solubility from Test Data |
And the plot does not look too bad, with no indication of anomalies.
Evaluation of plsr Model
Because we have the observed solubility values for the 'test' data we can evaluate how well the model performed. However in the usual circumstances, we would not know the actual values, hence what we are doing- predicting values from the test predictor data.
Using the observed values in solTestY and the predicted values in pls.pred2[,1,1], we can use the defaultSummary() function to obtain the RMSE and Rsquared, as shown below.
| Evaluation |
And there we have it, folks! This (lengthy) post covered partial least squares regression in R, starting with fitting a model and interpreting the summary to plotting the RMSEP and finding the number of components to use. Then we predicted solubilities from the the test data with the plsr model we fitted to the training data.
Check back for more posts on predictive modeling! Happy programming guys!
Thanks for reading,
Wayne
@beyondvalence


This comment has been removed by the author.
ReplyDeleteHelpful
ReplyDeleteEveryone wants to get unique place in the IT industry’s for that you need to upgrade your skills, your blog helps me improvise my skill set to get good career, keep sharing your thoughts with us.
ReplyDeleteData Science Online Training|
R Programming Online Training|
Hadoop Online Training
Thanks for your informative blog!!! Keep on updating your with such awesome information.
ReplyDeleteHadoop Training in Marathahalli|
Hadoop Training in Bangalore|
Data science training in Marathahalli|
Data science training in Bangalore|
Hello,
ReplyDeleteThank you very much for this post. I found it very useful, since I am working on a modelling problem of TGA data for the first time. In my case, I do not have a plateau after the minimum RMSEP and the defaultSummary function returns RMSEP= NA. How would you explain that situation? Any clue?
useful information.Angular training in Chennai
ReplyDeleteValence Analytics: R: Partial Least Squares Regression, Rmsep, And Components >>>>> Download Now
ReplyDelete>>>>> Download Full
Valence Analytics: R: Partial Least Squares Regression, Rmsep, And Components >>>>> Download LINK
>>>>> Download Now
Valence Analytics: R: Partial Least Squares Regression, Rmsep, And Components >>>>> Download Full
>>>>> Download LINK
Great post! Your clear explanation of Partial Least Squares Regression and its practical applications in predicting solubility is very insightful. Thank you for sharing your expertise!
ReplyDeletecyber security internship for freshers | cyber security internship in chennai | ethical hacking internship | cloud computing internship | aws internship | ccna course in chennai | java internship online