Loading...
Showing posts with label SQL. Show all posts

Friday, August 1, 2014

Deploying Database Changes from Visual Studio to SQL Server 2012


Hello Readers,

Today we will demonstrate how to deploy a database using SQL Server Data Tools (SSDT), available in Visual Studio Shell. SSDT is a power tool where we can crease databases and database objects- and also perform database schema compares. Here I will show you how to connect Visual Studio to SQL Server and deploy (publish) a database.

SQL Server


When you login to SQL Server Management Studio, in the Object Explorer to the left, you can navigate through the databases. Here we have the famous AdventureWorks database already loaded. We aim to modify a column in the Person.Address table.


Figure 1. Object Explorer with AdventureWorks

Right-clicking the AddressLine1 column and select Properties to see the column properties. We will increase the length from 65 to 70, as an example.


Figure 2. AddressLine1 Properties

Data Tools in Visual Studio


Now that we have located the target column, we open Visual Studio to use the SQL Server Data Tools. First we need to create a new Project and a new connection to the AdventureWorks database in SQL Server.


Figure 3. Visual Studio New Project

Make sure you have selected the SQL Server Template to your left, and the SQL Server Database Project should appear in the middle dialogue box. Name your database and click OK. 


To connect to the SQL Server and database, right-click the project name and select Import   -> Database. Select New Connection and type in the server information and choose the database name from the drop down list towards the bottom of the Connection Properties window. You can click the Test Connection button at the bottom left, to see if you have the correct server typed in, and valid database selected.

Figure 4. Adding a New Connection

Also, change the Folder Structure in the Import Settings to Object Type.

Figure 5. Finishing Importing AdventureWorks

After you click Start, Visual Studio will begin to import AdventureWorks. After it is finished, in the Solution Explorer to the right, navigate to the Tables folder and select the first table, Address.sql. This table contains the column, AddressLine1, whose length we want to modify.

Figure 6. AddressLine1 Column in Address.sql Table

Simply click the Data Type nvarchar(65) and change it to nvarchar(70), and save all.

Deploying AdventureWorks


Since we have finished with our changes, we now need to deploy those changes into SQL Server. Right-click the AdventureWorks Project Folder in the Solution Explorer and select Publish. Re-enter the connection details and hit Publish. 

Figure 7. Publishing AdventureWorks

The middle highlighted box is the Publishing Options, and the bottom box shows the Output Dialogue Box. Note that it says the "Build: 1 succeeded".

Figure 8. Data Tools Output- Publishing

Turning back to SQL Server, in the Object Explorer, click the Refresh button with the circular arrows. Then navigate to the Person.Address Table and right-click the AddressLine1 column. Observe the change in length! It is now 70 characters long.

Figure 9. Checking AddressLine1 Length 70

Fantastic! We were able to connect to the AdventureWorks database in SQL Server, and change the length of a column in a table using SQL Server Data Tools in Visual Studio. Then we deployed those changes back into SQL Server and observed the changes. This is just a taste of what SQL Server is capable of when combined with SQL Server Data Tools- Visual Studio.

Stay tuned for more SQL posts!


Thanks for reading,

Wayne
@beyondvalence
LinkedIn

Tuesday, December 10, 2013

Importing Data into a Database Engine, SQL Server 2012

Hello Readers!

Welcome back. We need data to be able to query tables. So today we will walk through how to import data into a Database Engine in SQL Server Management Studio 2012. Click here for more info on SSMS 2012. 

Let us get started!


The Setup


First, open SQL Server Management Studio (SSMS). We are greeted with a dialogue box to connect to a server. I will use Windows Authentication to connect to my local server. 


Connect to a Server
After we have connected, we see the Object Explorer to the left of the screen. The Server will show a green arrow to indicate a successful connection. The Object Explorer allows us to view and manipulate the different utilities, tools, and capabilities in SSMS. The expanded explorer box is shown below. Note the green 'good to go' arrow by the server name.


Connection Established


Importing the Data


Now we need to import the data. It would be helpful if we had the target data already on the computer, and in this case, we will be importing the familiar AdventureWorks database which exists as an Access database file. We can also import it as an mdf (mirror disk file) from this link.

Start by right clicking the database to where the data will be imported. Now from Tasks, click Import Data... towards the bottom.


Import Data Button

In step, we are in the SQL Server Import and Export Wizard. As shown below. Select the appropriate data source and locate the file on the hard drive:

Select the Data Source and Location


After choosing the input specifications, we need to choose the output Destination. I will import the data into the POWER (short for PowerPivot) database.

Choosing the Destination

And then for the nitty-gritty of specifying which tables to copy. We have two options: manual selection or SQL query. Select either, I will select manual because I will be copying all the data.


Specify Which Selection Method

After which, we can check the boxes of the tables we require. Clicking the box at the top left will select all of the tables. Click Next.

Selecting Tables

We are then given a review of the selected tables before they are imported into the database. The table attributes and types are shown to verify the correct tables have been selected, below.

Data Type Review
Clicking Next and Finish, we now have the tables in the POWER database. The Object Explorer below reflects the newly imported tables.

Object Explorer with New Tables

And with the new query window open, we can now query tables that we require!

Blank Query Window

That concludes this post on how to import data into a database in SQL Server Management Studio 2012. Future posts will include SQL querying and use of the SSMS Analysis Services to analyze the data. Also, I will include a post on using R to connect to SQL Server to retrieve tables. Please look forward to the new posts!


Thanks for reading!


Wayne

Monday, December 9, 2013

P4.4: Data Modeling in PowerPivot: Relationship JOIN Types

Hello Readers,

In this post we will continue our discussion (from P4.3) on the types of JOINS we can use when creating relationships, especially through SQL queries. As usual, we will be using the AdventureWorks dataset from the Ferrari book. Let us begin.


JOINS


When we join two tables together, we have to determine what we want in the resulting table. Whether we need all of the rows in a specific table or just the matches in both, specific joins enable us to manipulate the merging of two tables in different ways. Subsequently, the left and right tables we choose have positional distinctions when we select a specific type of join method. 


Detailed below are the different types of joins. (Diagrams from stackoverflow.)


INNER JOIN


When two tables are joined using an inner join, only the rows in table A which match the related rows in table B will be included in the resulting table. This is why in the previous post, P4.4, the joining of DimProduct with 606 entries and DimProductSubcategory tables yielded only 397 entries. There were only 397 product rows which had both an EnglishProductCategoryName and EnglishProductSubcategoryName.


LEFT OUTER JOIN


The left join is similar, but includes the all the entries in table A, and records NULL for entries in table A with no corresponding entries in table B.


RIGHT OUTER JOIN


The right outer join is the mirror image of the left outer join. All entries in Table B will be included, and those rows without a corresponding row in Table A will show NULL.


FULL OUTER JOIN


Next is the full outer join where both Tables A and B are preserved, with entries in Table A with none in B, and entries in Table B without entries in A will show as NULL.


LEFT EXCLUDING JOIN


Using left exclusion join we can modify the join to yield only entries in Table A which do not match in the right Table B.


RIGHT EXCLUDING JOIN


Likewise with a right excluding join, the all entries in Table will be included except for those which have corresponding entries relative to entries in Table A.


Here is a helpful link!


Thanks for reading,


Wayne Liu

Thursday, November 14, 2013

P4.3: Data Modeling in PowerPivot: SQL Query Denormalization

Hello Readers,

This post is a continuation from the last post of understanding normalization in data modeling using PowerPivot. As usual, we will be using the AdventureWorks companion material from the Ferrari book. Let us get started.


SQL Querying in PowerPivot


In the previous post I demonstrated how to denormalize a table in PowerPivot by creating calculated columns using the RELATED command. The RELATED command is an easy tool to understand denormalization. However, with SQL queries we can normalize with ease in a large database. Here we will query in SQL the necessary columns and tables to denormalize a data model. The denormalization process will be shifted outside of PowerPivot versus the previous method of denormalizing within PowerPivot using the RELATED command.


A SQL query is a statement written in SQL language used in many modern relational databases. PowerPivot has a built-in SQL query designer, of which we will discuss further.


Begin by adding AdventureWorks data from SQL Server. In the Home tab of PowerPivot, click from Database and From SQL Server option.


Fig. 1: Add External Data from SQL Server in PowerPivot
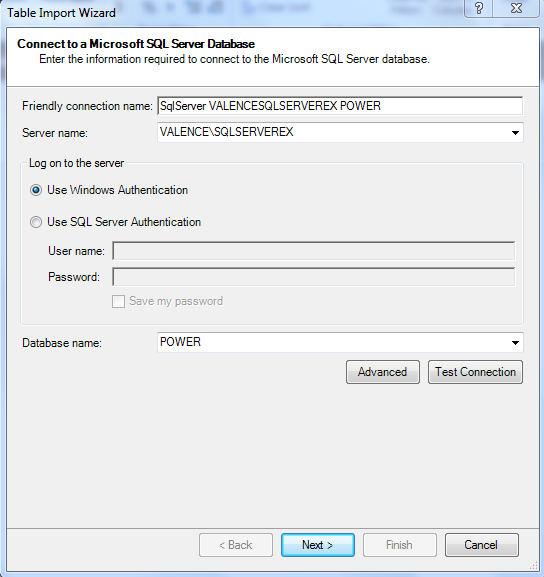
The Table Import Wizard will appear. Type in the Server name and select the Database name from the drop-down menu. In this case, the AdventureWorks tables are located in the POWER Database.


Fig. 2: Connecting to SQL Server Database
After a connection is established, select Write a query because we will demonstrate how to use SQL queries to denormalize a data model.


Fig. 3: Use Query Method
Next we are given the option to enter the SQL query. Knowing SQL, we can type in:

SELECT
  DimProduct.ProductKey
  ,DimProductCategory.EnglishProductCategoryName
  ,DimProductSubcategory.EnglishProductSubcategoryName
FROM
  DimProductSubcategory
  INNER JOIN DimProductCategory
  ON DimProductSubcategory.ProductCategoryKey = DimProductCategory.ProductCategoryKey
  INNER JOIN DimProduct
  ON DimProductSubcategory.ProductSubcategoryKey = DimProduct.ProductSubcategoryKey

But for now, click the Design button as show below in Figure 4 to use the SQL query designer.


Fig. 4: Select PowerPivot Query Designer
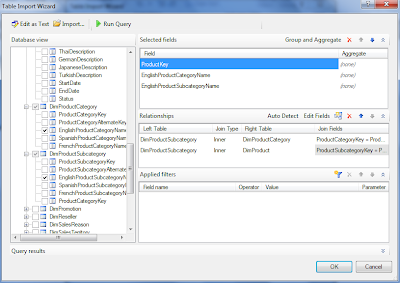
With the SQL query Designer open, select the ProductKey from DimProductEnglishProductCategoryName from DimProductCategory, and EnglishProductSubcategoryName from DimProductSubcategory.


Fig. 5:  SQL Query Designer
In the Relationships section, the DimProductSubcategory has the Primary Keys to the categories and subcategories to the DimProduct and DimProductCategory tables. This illustrates the one-to-many relationship, indicated by the left and right tables. The Join Fields are shown in Figure 5 as well. Now click OK, and we get SQL query statement designed by the point and click SQL query designer (Figure 6.)


Fig. 6: SQL Query Statement from SQL Query Designer
Hitting Finish, the Table Import Wizard implements the query statement and imports the specified table into the PowerPivot database.


Fig. 7: Query Table
Now we have denormalized a data model by using SQL queries to retrieve columns from different tables into one table. Note that 397 rows were imported. This is less than the 606 rows in the DimProduct. Where did the other 209 rows go? The 397 rows from the query is a result of the type of relationship between the tables, in this case is an INNER JOIN, which only returns rows with matching values in both tables. The next post will discuss the different types of JOINS.


Thanks for reading,


Wayne