Hello Readers,
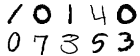
Today we will classify handwritten digits from the MNIST database with a neural network. Previously we used random forests to categorize the digits. Let us see how the neural network model compares to the random forest model. Below are 10 rendered sample digit images from the MNIST 28 x 28 pixel data.
Instead of using neuralnet as in the previous neural network post, we will be using the more versatile neural network package, RSNNS. Lastly, we evaluate the model with confusion matrices, an iterative error plot, regression error plot, and ROC curve plots.
MNIST Data
Ah, we return to the famous MNIST handwritten digits data set (available here). Each digit is represented by pixels 28 in width and 28 in height, for a total of 784 pixels. The pixels measure the darkness in grey scale from blank white 0 to 255 being black. With a label denoting which numeric from 0 to 9 the pixels describe, there are 785 variables. It is quite a large data set considering the 785 variables from 42,000 rows of image data.
I made it easier to manage, and faster to model by sampling 21,000 rows from the data set (half). Later, I might let the model run overnight for the entire 42,000 rows, from which I will update the results in this post. Recall that the random forest model took over 3 hours to crunch in R.
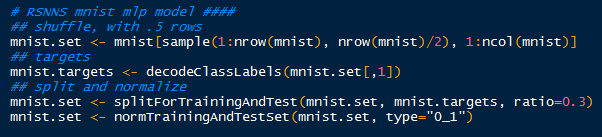
After I randomly sampled 21,000 rows, I began to create the targets inputs for which to train the input data. Afterwards with splitForTrainingAndTest(), the targets and inputs are separated into- you guessed it, training and test data according to ratio I set at 0.3. Because the grey scale values proceed from 0 to 255, I normalized them from 0 to 1, which is easier for the neural model.
 |
| Tidying Up the Data |
Now the data is ready for the neural network training with the mlp() function. It creates and trains a multi-layered perceptron- our neural network.
 |
| Training the Neural Network |
And after some time, it will complete and we can see the results! Also evaluate and predict the test data with the model.
Results and Graphs
With 784 variables, calling summary() on the model would inundate the R console, since it would print the inputs, weights, connects, etc. So we need to describe the model in different ways.
Confusion Matrix
How about looking at some numbers? Specifically, at the confusion matrix of the results for the training and test data using the function confusionMatrix(). (Note that R will mask the confusionMatrix() function from the caret package if you load RSNNS after caret- access it using caret::confusionMatrix()).
We pass the targets for the training data, and the fitted values (predicted) from the model to compare how the model classified the targets with the actual targets. Also, I changed the dimension names to 0:9 to mirror the target numerals they represent.
 |
| Creating Training and Test Confusion Matrices |
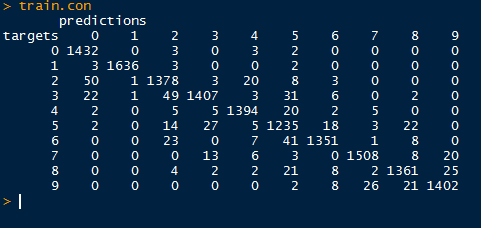
Regard the confusion matrix from the training data below. Ideally, we would like to see a diagonal matrix, indicating that all the predicted targets matched the actual targets. However, that is hardly realistic in the real world, and even the best models get 1 or 2 misclassifications.
Despite that, we do see the majority of predictions to be on target. Looking at target 4 (row 5), we see that 2 were classified as 0, 5 as 2 and as 3, 1,394 correctly as 4, 20 as 5, 2 as 6, and so on. It appears as the model best predicted target 1, as there were only 8 misclassifications for a true positive rate of 99.51% (1636/(3+1636+3+2)).
 |
| Training Confusion Matrix |
Next we move to the test set targets and predictions. Again, target 1 has the highest sensitivity in predicting true target 1's at 97.7% (673/(6+673+10)). We will visualize the sensitivities using ROC curves in the post.
 |
| Test Confusion Matrix |
Now that we have seen how the neural network model predicted the image targets, how well did they perform? To measure the errors and the measure of model fit we turn to our plots, beginning with iterative error.
Iterative Error
For our first visualization, we can plot the sum of squared errors for each iteration of the model for both the training and test sets. RSNNS has a function called plotIterativeError() which will allow us to see the progression of the neural network training.
 |
| Plotting Iterative Error |
As we look at the iterative error plot below, note how SSE declines drastically through the first 20 iterations and then slowly plateaus. This is true for both the training and test values, while the test values (red) do not decrease as much as the fitted training values (black).

Regression Error
Next, we evaluate the regression error for a particular target, say column 2, which for the numeric target 1 with the plotRegressionError() function. Recall that the numeral targets proceed from 0 to 9.

Observe the targets are categorical, taking values either 0 or 1,while the fitted values from the mlp() model range from 0 to 1. The red linear fit is close to the optimal y=x fit, indicating an overall good fit. Most of the fitted values lie close to 0 when predicting the target value 0, and close to 1 when the target value is 1. Hence the close approximation of the linear fit to the optimal fit. However, note the residuals on the fitted values, as some vary to 1 when the target is 0 and vice versa. Therefore, the model is not perfect, and we should expect some fitted values to be misclassifications- as seen in the confusion matrices.

Receiver Operating Characteristic (ROC)
Now we turn to assessment of a binary classifier, the receiver operating characteristic (ROC) curve. From the basic 2 by 2 contingency table, we can classify the observed and predicted values for the targets. Thus we can plot the false positive rate (FPR) with the recall, or sensitivity (true positive rate- TPR).
Remember that the FPR is the proportion of positive predictions which are actually negative (or 1-specificity), and the TPR is the proportion of positive prediction which are actually positive. With plotROC() we can plot the classification results of the training and test data for target column 3, for the numeral 2.
 |
| Plotting ROC Curves for Training and Test Sets |
Points above the line of no discrimination (y=x) in a ROC curve are considered better than random classification results. A perfect classification would result in a point (0 , 1), where the false positive rate is 0 and the sensitivity is 1 (no misclassification).
So when we look at the ROC curve for the training data, we see that the model did pretty well in classifying the target column 3, the image of 2's. The top-left corner approaches a sensitivity of 1, while the false positive rate is close to 0. The majority of 2's were classified correctly, with a few 2's being misclassified as other numbers.

For the test data, we see a slight difference in the ROC curve. There was a small difference in the model classifying 2's correctly, as the test data sensitivity does not approach the high levels as the training sensitivity until it reaches a higher false positive rate. That is to be expected, as the model was fitted to the training data, and not all possible variations were accounted.

Remember that we, established that target column 2, or 1's have the highest sensitivity. We can plot the ROC curve for the test set for the 1's to compare it to the ROC curve of test 2's.

The ROC curve for 1's does reflect our calculations from the test set confusion matrix. The sensitivity is much higher, as more true positive 1's were classified than the 2's. As you can see, the ROC curve for 1's achieve a higher sensitivity for similar values of low false positives, and reaches closer to the top left 'ideal' corner of the plot.
And here is the end of another lengthy post. We covered predicting MNIST handwritten digits using a neural network via the RSNNS package in R. Then we evaluated the model with confusion matrices, an iterative error plot, a regression error plot, and ROC plots.
There is much more analysis we can accomplish with neural networks with different data sets, so stay tuned for more posts!
Thanks for reading,
Wayne
@beyondvalence
Extra Aside:
Do not be confused by a confusion matrix.
hey thanks for your tutorial
ReplyDeletei am getting this error message when trying to run your model
Error in rsnnsObjectFactory(subclass = c("mlp"), nInputs = nInputs, maxit = maxit, :
object 'o.1' not found
Dapatkan Pasaran Bola Terbaik di Situs Agen Resmi BOLAVITA !
ReplyDeletewww.bolavita.site Agen Taruhan Bola Online yang sudah di percaya dan sudah berdiri sangat lama di dunia perrjudiian Indonesia !
Aman dan Terpercaya !
Hubungi Cs kami yang bertugas 24 jam Online :
BBM: BOLAVITA
WA: +6281377055002
Atau bisa langsung download Aplikasi Resmi BOLAVITA :
Aplikasi Playstore : Bolavita Sabung Ayam
I cannot thank you enough for the blog.Thanks Again. Keep writing.Data Science Online Course
ReplyDeleteData Science Training