Hello Readers,
Plots, graphs, and visualizations. They are ways we interpret data, allowing us to examine patterns in the numbers, and to form analyses from our understanding of the data. Some might say graphics capture the big picture or represent a thousand words, exemplified by the famous infographic describing Napoleon and his fate at Waterloo drawn by Charles Joseph Minard in 1869:
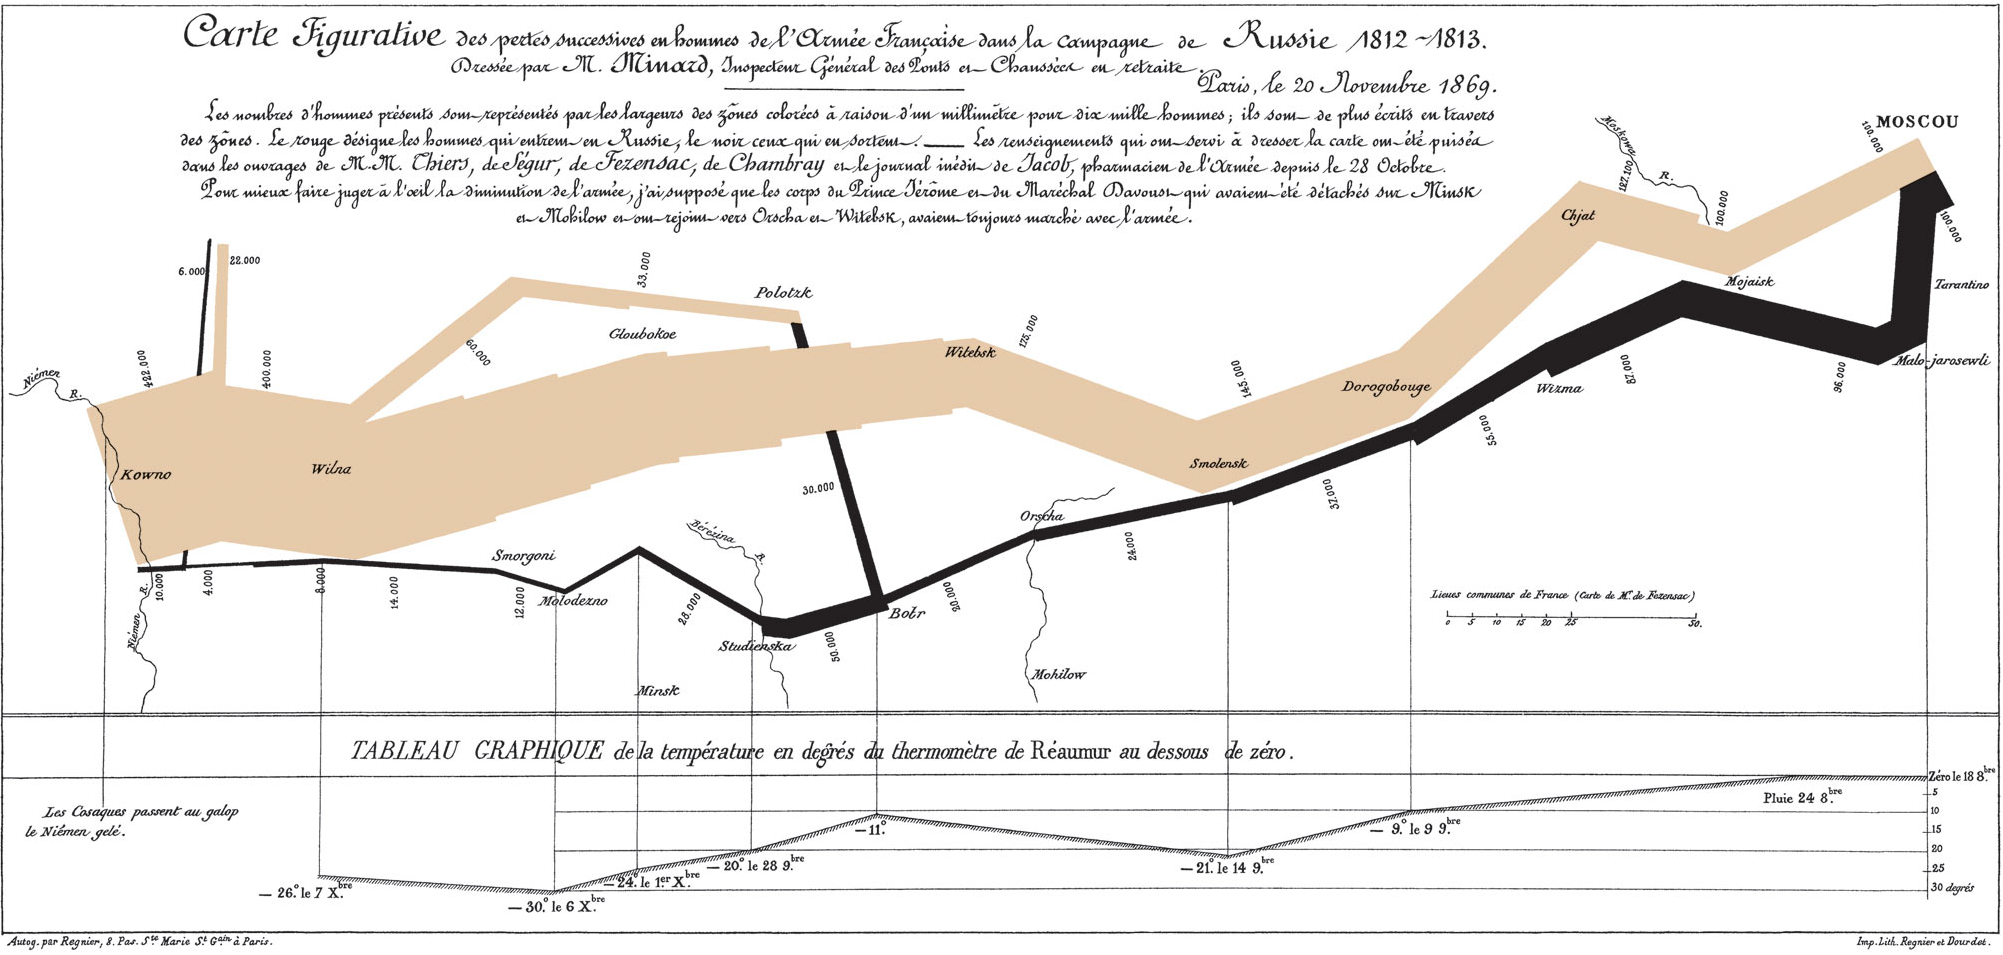 |
| 'The Greatest Infographic |
While I have been using R mainly for creating visuals (other than the time where I used Photoshop to fine tune a palladium price plot), here exists libraries outside of R for visualization, namely, D3.js. Created by Mike Bostock, Data Driven Documents (D3) operates under the Document Object Model (DOM), and provides an efficient, functional method to code visualizations in Javascript.
Here I will demonstrate how to setup an simple environment for tinkering with D3, and to create a bar chart of when Github users commit (submit) code. I assume you have a basic understanding of HTML and Javascript to begin. The data is available here. Start your favorite text editor (I use Notepad++), and the console (I use Cygwin bash).
Environment Setup
Before we begin working with D3, we need to setup the environment to view the results. D3 combines HTML (hypertext markup language), CSS (cascading style sheets), and SVG (scalable vector graphics) to display graphics. In your designated working directory, create an "index.html" file to house the HTML, and a "code.js" Javascript file to store the D3 script. Using Notepad++ I created two files and named them such.
Here is the link to Swizec Teller's Github repository for the code for you to download if you do not want to type or copy the code. However, I find that typing the code reinforces your learning of a language's syntax.
Using the basic structure of HTML, we set up a <div> element with "id=graph", and as "class=span12" nested inside <div> class "row" and "container". For the <style>, we use CSS to specify the font size at 11, and the color of the bars as "steelblue". The <script> we designate the D3 javascript file at "http://d3js.org/d3.v3.min.js", and our graph code in "code.js". At the top, spot the <link> tag. Download that CSS bootstrap package which makes the resulting webpage visually appealing, or here at Github in the top under "bootstrap".
HTML and CSS Code:
1 2 3 4 5 6 7 8 9 10 11 12 13 14 15 16 17 18 19 20 21 22 23 24 25 26 27 | <!DOCTYPE html> <title>testing</title> <link href="bootstrap/css/bootstrap.min.css" rel="stylesheet"> <style> .axis path, .axis line { fill: none; stroke: #eee; shape-rendering: crispEdges; } .axis text { font-size: 11px; } .bar { fill: steelblue; } </style> <div class="container"> <div class="row"> <div id="graph" class="span12"></div> </div> </div> <script src="http://d3js.org/d3.v3.min.js"></script> <script type="text/javascript" src="code.js"></script> |
Note that we reference the D3 script at the end of the "index.html" as "code.js". Make sure to name the file that particular name.
D3 Code
After we establish the HTML, we can move on to scripting the graphic. The JSON file is available here. First we specify the size of the plot, and scale, and x-y axis locations from lines 1 to 10.
Following in line 12 to 15, we use the crucial "d3.select" to select the graph element from the HTML file, and ".append" or add a Scalable Vector Graphic (SVG) object with width and height attributes.
Beginning in line 17, we parse the "histogram-hours.json" file using "d3.json", and in lines 19 to 22 map the json elements to a "bucket" as an index and a "N" with the value. We rescale and set the plot boundaries with the "bucket" and "N" in lines 24-25.
An important D3 concept is the origin of the plot: the x starts at the left and the y starts at the top. So adding the x and y axes in lines 27 to 35, we take that into account.
Now we can use the "svg.selectAll" method to start adding the "rect" rectangles to the plot starting at line 37. Associate the data with ".data", and add or ".append" the data as a "bar class". We add a ".transition" to demonstrate animation to force the bars to appear from left to right. We specify the 'x' and 'y' values from the "bucket" and "N" values we mapped. The "width" and "height" of the bars take into account the areas of the plot, and the white-space padding. D3 Code:
1 2 3 4 5 6 7 8 9 10 11 12 13 14 15 16 17 18 19 20 21 22 23 24 25 26 27 28 29 30 31 32 33 34 35 36 37 38 39 40 41 42 43 44 45 46 47 48 49 50 | var width=900, height=400, pad=20, left_pad=100; var x = d3.scale.ordinal().rangeRoundBands([left_pad, width-pad], 0.1); var y = d3.scale.linear().range([height-pad, pad]); var xAxis = d3.svg.axis().scale(x).orient("bottom"); var yAxis = d3.svg.axis().scale(y).orient("left"); var svg = d3.select("#graph") .append("svg") .attr("width", width) .attr("height", height); d3.json('histogram-hours.json', function (data) { data = d3.keys(data).map(function (key) { return {bucket: Number(key), N: data[key]}; }); x.domain(data.map(function (d) {return d.bucket; })); y.domain([0, d3.max(data, function (d) {return d.N; })]); svg.append("g") .attr("class", "axis") .attr("transform", "translate(0, "+(height-pad)+")") .call(xAxis); svg.append("g") .attr("class", "axis") .attr("transform", "translate("+(left_pad-pad)+", 0)") .call(yAxis); svg.selectAll('rect') .data(data) .enter() .append('rect') .attr('class', 'bar') .attr('x', function (d) {return x(d.bucket);}) .attr('width', x.rangeBand()) .attr('y', height-pad) .transition() .delay(function (d) {return d.bucket*20; }) .duration(800) .attr('y', function (d) {return y(d.N); }) .attr('height', function (d) {return height-pad-y(d.N); }); }); |
The majority of the code is nested in the "d3.json" callback function (the part in between the curly braces {...}). Next we need to open the "index.html" file in Chrome to see it in action. Make sure all the files are together in the same working directory.
Chrome Developer Tools
Since the HTML code calls for local files, we start a simple HTTP Server with Python to avoid the security issues. In your console, type "python -m SimpleHTTPServer", and the Python will create a server on port 8000. Remember to start the Python server in the same directory as the HTML and Javascript files.
 |
| Starting Python Host via Console |
In Chrome, point the address bar to "localhost:8000" and the graphic will appear. If not, there is either a typo in the code, no server opened, or the files are not present in that directory. Below is a screenshot of the "steelblue" colored graphic. We see an expected elevation of activity during daylight hours ~9AM to 6 PM.
 |
| Code Submissions by Day Hours |
To make use of Chrome's Developer Tools, press <CTRL+SHIFT+J>. A similar window should appear with the Javascript content shown below. Examine the tabs at the top, "Elements", "Network", "Source", and etc. The Chrome Developer Tools (or DevTools) is quite a powerful website and debugging suite, and you can read more about it here. In the "Source" tab, we can select our code files hosted by Python.
 |
| "code.js" in DevTools |
I hope you enjoyed this post introducing the capabilities of D3.js, and how it thrives creating graphics in the HTML environment. Although we just created a bar graph, there are many other visualizations created by others at its main website. Stay tune for more visualizations and analysis.
Let me know if you want to see more of D3.js.
Thanks for reading,
Wayne
@beyondvalence
ReplyDeleteInformasi Khusus Untuk Kamu Pecinta Sabung Ayam Indonesia !
Agen Bolavita memberikan Bonus sampai dengan Rp 1.000.000,- Khusus Merayakan Natal & Tahun Baru !
Untuk Informasi Selengkapnya langsung saja hubungi cs kami yang bertugas :
WA : +62812-2222-995
BBM : BOLAVITA
Situs : www.bolavits.site
Aplikasi Live Chat Playstore / App Store : BOLAVITA Sabung Ayam
Baca Artikel Sepak bola terbaru di bolavitasport.news !
Prediksi Angka Togel Online Terupdate di angkamistik.net!