Loading...
Showing posts with label loading data. Show all posts

Tuesday, December 10, 2013

Importing Data into a Database Engine, SQL Server 2012

Hello Readers!

Welcome back. We need data to be able to query tables. So today we will walk through how to import data into a Database Engine in SQL Server Management Studio 2012. Click here for more info on SSMS 2012. 

Let us get started!


The Setup


First, open SQL Server Management Studio (SSMS). We are greeted with a dialogue box to connect to a server. I will use Windows Authentication to connect to my local server. 


Connect to a Server
After we have connected, we see the Object Explorer to the left of the screen. The Server will show a green arrow to indicate a successful connection. The Object Explorer allows us to view and manipulate the different utilities, tools, and capabilities in SSMS. The expanded explorer box is shown below. Note the green 'good to go' arrow by the server name.


Connection Established


Importing the Data


Now we need to import the data. It would be helpful if we had the target data already on the computer, and in this case, we will be importing the familiar AdventureWorks database which exists as an Access database file. We can also import it as an mdf (mirror disk file) from this link.

Start by right clicking the database to where the data will be imported. Now from Tasks, click Import Data... towards the bottom.


Import Data Button

In step, we are in the SQL Server Import and Export Wizard. As shown below. Select the appropriate data source and locate the file on the hard drive:

Select the Data Source and Location


After choosing the input specifications, we need to choose the output Destination. I will import the data into the POWER (short for PowerPivot) database.

Choosing the Destination

And then for the nitty-gritty of specifying which tables to copy. We have two options: manual selection or SQL query. Select either, I will select manual because I will be copying all the data.


Specify Which Selection Method

After which, we can check the boxes of the tables we require. Clicking the box at the top left will select all of the tables. Click Next.

Selecting Tables

We are then given a review of the selected tables before they are imported into the database. The table attributes and types are shown to verify the correct tables have been selected, below.

Data Type Review
Clicking Next and Finish, we now have the tables in the POWER database. The Object Explorer below reflects the newly imported tables.

Object Explorer with New Tables

And with the new query window open, we can now query tables that we require!

Blank Query Window

That concludes this post on how to import data into a database in SQL Server Management Studio 2012. Future posts will include SQL querying and use of the SSMS Analysis Services to analyze the data. Also, I will include a post on using R to connect to SQL Server to retrieve tables. Please look forward to the new posts!


Thanks for reading!


Wayne

Friday, August 16, 2013

P2.1: Loading Data from External Sources to PowerPivot

This post will describe how to load external data sources to PowerPivot, using examples from Chapter 2 of the Ferrari PowerPivot book.


Loading Data PowerPivot

In the previous posts, we have been adding tables to the data model from Excel. However this method is inefficient, as PowerPivot can load data directly into the data model, without going through Excel. By doing so, we only need to load the data once, and it loads as compressed data into memory. When loading, Excel does not compress data so the resulting size of the file is around 10 times larger at times when loaded through Excel rather than PowerPivot (sizes from previous posts). Also, Excel is limited to storing 1 million rows, and PowerPivot can handle hundreds of millions of rows in memory. So loading data into first into Excel then into PowerPivot can hit the limit of rows and curb efficiency.

However, the data in the data model cannot be edited in PowerPivot, and can be edited in Excel. This can help prevent unwanted modification to the data set in PowerPivot as it is read-only. If the data set is loaded into Excel, all Excel editing features are available. Despite being read-only in PowerPivot, it is possible to add new columns to the original tables by using DAX language, but the original tables stay the same.


Loading from the AdventureWorks Database

In the PowerPivot tab, click on the Manage button to open the PowerPivot window.


Fig. 1: Manage Data Model button
The PowerPivot window should appear, and to add data, click on the Get External Data button on the Home tab.


Fig. 2: Get External Data Button in PowerPivot
For this specific demo, we will use the database that was included in the companion material as a MS Access file. Choose the Access connection and the Table Import Wizard window will appear. Find the Access database file where it was saved by selecting Browse and click the Next button.


Fig. 3: Access Database Table Import Wizard
For accessing a database from Microsoft SQL Server, click the SQL Server button. Fill in the Server Name and use the proper Authentication. 


Fig. 4: Microsoft SQL Server Table Import Wizard
The next window appears allowing two options to import the data: select the desired tables from a list, or write a SQL query to specify the data. For simplicity, select the first option to select from a list.


Fig. 5: Choosing How to Import the Data Window
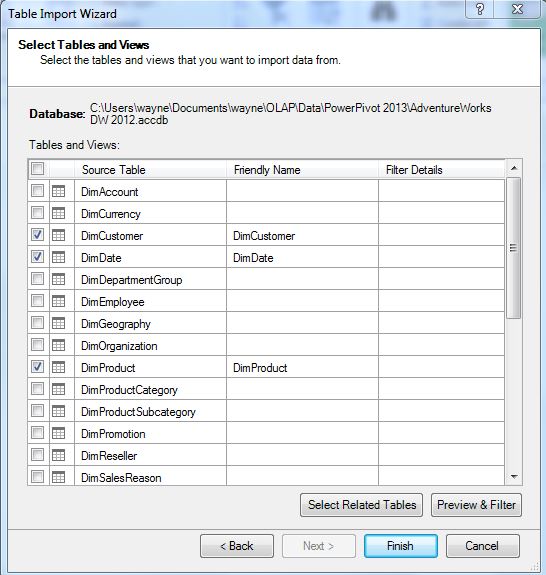
Now we can select the four tables required: DimCustomer, DimDate, DimProduct, and FactInternetSales from the Table Import Wizard.


Fig. 6: Selecting the Tables
After clicking Finish, the tables are loaded into the data model. Select Diagram View in the bottom right-hand corner of the PowerPivot window to see how the tables relate to another. Relationships were explained in P1.2. The FactInternetSales table contains many key fields, as diagrammed below.


Fig. 7: PowerPivot Diagram View

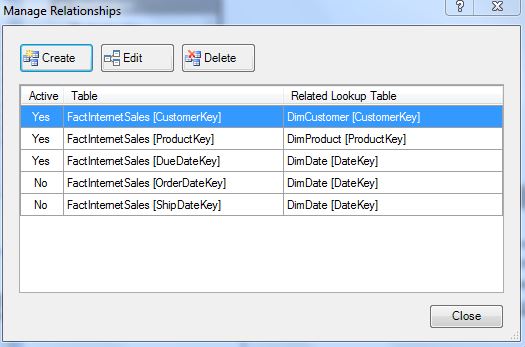
Under the Design tab, clicking Manage Relationships will allow us to modify relationships between tables. The current relationships between the four tables in our data model are shown below in Figure 8.


Fig. 8: Manage Relationships Window in the Data Model


Creating a PivotTable in PowerPivot

After we have loaded the data into PowerPivot, we can create a PivotTable from the data model. Select the PivotTable button under the Home tab, highlighted in Figure 9. 


Fig. 9: PivotTable Button in PowerPivot
A dialogue box will appear (Figure 10) asking where to insert the new PivotTable, and we will create it in a New Worksheet. Since we are adding the PivotTable from the data model in PowerPivot, we do not have to specify from which data model we would like to create.


Fig. 10: Determining the Location of the New PivotTable
Clicking OK will complete the PivotTable creation process.


Fig. 10: Blank PivotTable Created from PowerPivot
Now working within the blank PivotTable (Figure 11), we can select the fields from the tables and place them in a defined quadrant:

  • Color from the DimProduct table to Rows quadrant,
  • CalenderYear from the DimDate table to the Columns quadrant,
  • SalesAmount from the FactInternetSales table to the Values quadrant.

Fig. 11: SalesAmount by Color by CalendarYear PivotTable
This shows how easily we can aggregate and slice values from different tables in a report for the SalesAmount, thanks to relationships which link the tables together.

In the next post we will create calculated columns and calculated fields into the PivotTable we just realized.


Thanks for reading,
Wayne