Loading...
Showing posts with label DAX. Show all posts

Friday, August 23, 2013

P3.2: Beginning DAX 2

And we are back again for more DAX! This post is a continuation in the understanding DAX series (link to P3.1.) Here we will gain a deeper understanding of calculated columns and fields (introduced in P2.2) from a DAX perspective.


Understanding Calculated Columns & Fields

Calculated columns and calculated fields are actually quite different despite initial similarities. Here we will explore the differences of columns of fields, while gaining DAX concepts and syntax.


Calculated Columns

Before in P2.2, we touched upon the notion of creating a calculated column and a calculated field. By clicking the Add Column button on the Design tab, we can create a calculated column in PowerPivot. It is versatile in PivotTables; also the DAX expression for the column applies to the current row of the table. When we reference a column, it returns the value of that particular column in that specific row.


Fig. 1: Add Column Button
Note:
There are DAX functions which aggregate the values of a column for a whole table. To evaluate a subset of rows, we use DAX to specify a range of rows or a single value from another row and operate on that subset table. Essentially we can restrict rows and apply filters so the desired rows are selected for computation.


Calculated Fields

Now for something a little different. While calculated fields use the same DAX syntax as calculated columns, calculated fields evaluate the expression at the context of the cell of the PivotTable, not at the row level of the PowerPivot table like a calculated column.


Fig. 2: Calculated Fields Button
Which is why we arrived at a wrong result when we tried to calculate the gross margin as a percentage of the sales as a calculated column. In fact, PowerPivot calculated the gross margin percentage for each row using that method. What we wanted was to divide the gross margin by the sales within the context (column and row designation) of the PivotTable; we did not want each percentage in each row added, we required the gross margin percentage of the total (in say, Year 2006.)

So if we used the regular formula to calculate a field, we could get the following error:


Fig. 3: Calculated Field Error Using the Same DAX Expression as Calculating a Column
That is because the GrossMargin column has a different value in each row, and we would rather see the aggregate of the GrossMargin divided by the aggregate SalesAmount for each cell context in the PivotTable.

The correct method was to type in the sum of each:
=SUM(Sales[GrossMargin]) / SUM(Sales[SalesAmount])
and then divide them, as shown in Figure 4.


Fig. 4: Using the SUM for the Correct Calculated GrossMarginPct Field (See: No Errors!)
By using this approach, in the PivotTable, the column and row would have the labels as the context for the cells involved. So when it goes to take the SUM of the GrossMargin and the SUM of the SalesAmount, this specific PivotTable takes the SUM for a certain Year context, and summing values in the DAX expression, say for 2007. The PivotTable with GrossMarginPct added is shown below.


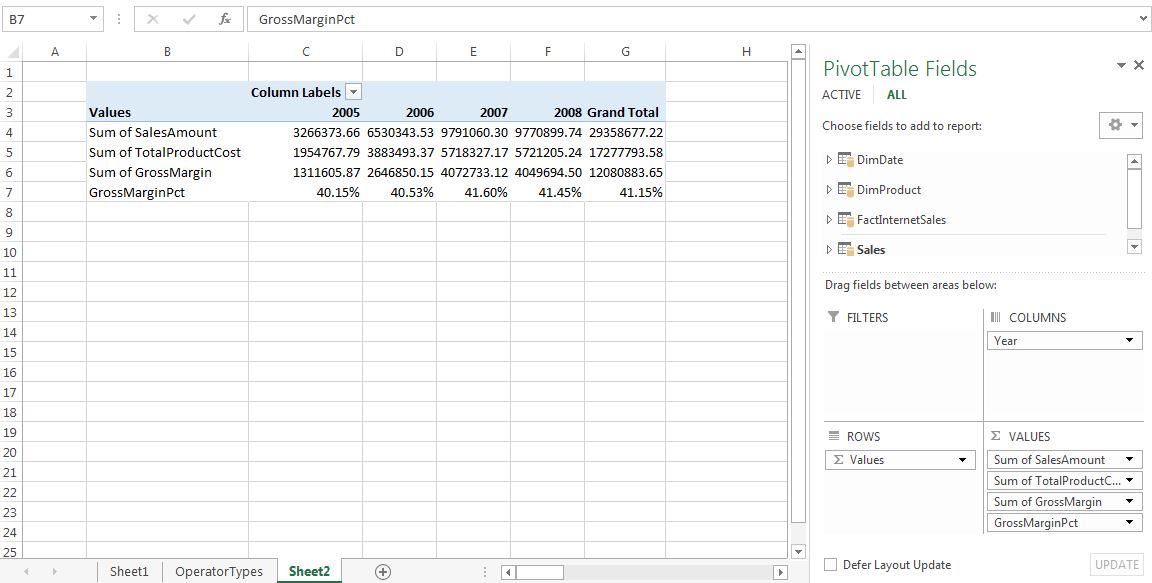
Fig. 5: PivotTable with GrossMarginPct


When to Use Calculated Columns and Measures (Fields)

So when do we use a calculated column and in other cases, a calculated field (or measure)? (When do we get to eat Jell-O?) In most situations, it would depend on the computation of choice. For example, there are several situations to use calculated columns:

  • When we want to evaluate an expression which is confined to the current row,
  • The results will be displayed in the columns or rows of the PivotTable, and not the values,
  • Or when we categorize text or numbers (categorical variables)

Situations where we would use calculated fields occur when we would like to display the results in the PivotTable Values section. Each cell in the Values section will change based on the context of the rows and columns in the PivotTable selections. If we changed the rows in Figure 5 to include the ModelName, then the calculationed field would reflect the change, and show the GrossMarginPct stratified by ModelName (Figure 6).


Fig. 6: PivotTable with ModelName Stratifying the Calculated Field


Cross-Referencing

We can use calculated columns in our DAX expressions when creating calculated fields. Also, the reverse can be done as well. However counter-intuitive, a calculated column can reference calculated fields, and this confines the calculated field to the context of the current row. Therefore, the calculated field transforms into a calculated column, and will not be influenced by user changes in context on the PivotTable.


Here we have explored the similarities and (for the most part) differences between calculated columns and fields through DAX. Understanding these concepts are important in becoming proficient at DAX, as well being able to manipulate data efficiently.


Thanks for reading,

Wayne

Sunday, August 18, 2013

P3.1: Beginning DAX 1

Hi Readers, this post will introduce the DAX language. As usual, we will use Chapter 3 Sales Example of the companion material of the Ferrari PowerPivot book. Let us get started.


Fundamentals of DAX

First, a little background. DAX stands for Data Analysis eXpressions language. This PowerPivot syntax is similar to Excel expressions, but also allows users to handle data stored in different tables in more advanced calculations. Therefore, while Excel uses table coordinates such as A1, or C3, DAX uses tables and columns as coordinates. Post 1.6 touched upon the notion of row and column oriented databases. Clearly, DAX is column oriented, and can pull a value for a column in a single row, the entire table, or some subset in between.

We will cover DAX syntax, data types handled by DAX, basic operators, and how to refer to tables and columns in PowerPivot in this post. Here we go!


DAX Syntax

Let us start by an example. Opening the PowerPivot window, we observe the Sales table with columns SalesAmount and TotalProductCost towards the end.


Fig. 1: Sales Table in PowerPivot
Subtracting TotalProductCost from the SalesAmount gives us the margin. Type the following formula for the GrossMargin:
=Sales[SalesAmount]-Sales[TotalProductCost]
Fig. 2: GrossMargin Column Added
We can see from the formula (a calculated column) that we refer to the table name and the column name for this DAX expression, which handles numeric values and returns numerical values. This is basic DAX syntax.


DAX Data Types

DAX can handle numerical values, such as:


  • Integer
  • Real
  • Currency
  • Date (or datetime)
  • True/False (Boolean)
  • String
  • BLOB (Binary Large OBject)

PowerPivot has a great type-handling system; we can use DAX expressions and the resulting type is based on the type of terms used in the expressions. So if a term in the expression is a date, then the result would be a date, if an integer, then the result would be an integer. This is called operator overloading. For example, we can add a week to the Date column by adding seven to create a DatePlusOneWeek column.
=Sales[Date] + 7
Fig. 3: DatePlusOneWeek Column Calculation
The DAX expression adds 7 days (one week), to the Date column and returns the Date a week later, in DatePlusOneWeek. June 1, 2008 was transformed into June 8, 2008, as a date numeric type.

PowerPivot will automatically convert numbers into strings and in reverse when the operator requires it. So when we have the expression 

= 5 + 4 
and replace the operator with & to concatenate strings, the 5 and 4 will be converted into strings. The result of 
= 5 & 4 
is "54" (the " " indicates a string.) In reverse, when we have strings  "5" and "4" being added together: 
= "5" + "4"
we get 9. Using the operator to determine the type of the resulting value is convenient, but we will encounter handling errors in later posts.

Considerations of Specific Data types:

Date
PowerPivot stores datetime as a floating point number. In fact, the floating point number corresponds to the number of days starting from December 30, 1899, and the decimal represents the fraction of the day. The seconds, minutes, and hours in a day are converted into decimal fractions. If we evaluate this idea by:
= NOW() + 1
we would have an expression which adds one to the floating point. Thus it adds one day to today and we get essentially the date for tomorrow (with the same hours, minutes, and seconds.)

True and False
True and False represent logical conditions, and is usually called a Boolean data type. For example, the expression
=Sales[TotalProductCost] >= Sales[SalesAmount]
would return True if the TotalProductCost of the row was greater or equal to the SalesAmount, and False if the it was less.


Dax Operators

Figure 4 below shows the different DAX operators and examples. We have seen many before.

Fig. 4: DAX Operator Types

DAX Values

The values used in Figure 4, such as "USA" or 0, are called literals and is straightforward. However, when referencing column names in the format:
'Table'[Column]
we usually can omit the quotation marks if the table name has no special characters or spaces to:
Table[Column]
We also can use the column name by itself, which is always enclosed in square brackets:
[Column]
and the expression will find the referenced column name in the current table.
For the sake of readability, and to prevent mistakes, use the table name in conjunction with the column name.

Note on IntelliSense:

When we type into the formula box in PowerPivot, a helpful window appears, listing the names of all the function names and references. For example, if we type in
=[
to begin a column name, a listing of all the column names will appear.

Fig. 5: IntelliSense Displaying the Possible Column Names
We will continue to explore DAX in the next post, P3.2.


Thanks for reading,
Wayne